Hair Extension

Hair Extension Methods Demystified: Tape-In vs. Fusion vs. Clip-Ins

Long, voluminous hair is a timeless beauty trend, and hair extensions have made it possible for anyone to achieve their dream hair. With various hair extension methods available, it’s essential to understand the differences between them to make the right choice for your desired look and lifestyle. In this article, we’ll demystify three popular hair extension methods: Tape-In, Fusion, and Clip-Ins, helping you choose the perfect option for your hair goals. Tape-In Hair Extensions: Seamless and Low-Maintenance Tape-In hair extensions are among the most popular choices for those seeking a seamless and low-maintenance solution. Here’s what you need to know about this method: 1. Application Process: 2. Duration: 3. Maintenance: 4. Natural Look: 5. Versatility: 6. Time-Saving: Fusion Hair Extensions: Long-Lasting and Natural Fusion hair extensions are known for their durability and natural look. Here’s what you should know about this method: 1. Application Process: 2. Duration: 3. Maintenance: 4. Natural Look: 5. Versatility: 6. Longer Application Time: Clip-In Hair Extensions: Temporary and Convenient Clip-In hair extensions are an excellent choice for those who want a temporary and convenient hair transformation. Here’s what you need to know about this method: 1. Application Process: 2. Duration: 3. Maintenance: 4. Natural Look: 5. Versatility: 6. Ideal for Occasions: Choosing the Right Hair Extension Method Now that you have an overview of each hair extension method, how do you choose the right one for you? Here are some factors to consider: 1. Duration: 2. Maintenance Commitment: 3. Natural Look: 4. Versatility: 5. Time and Application Process: 6. Budget: Conclusion Choosing the right hair extension method depends on your preferences, lifestyle, and desired look. Whether you opt for the seamless blend of Tape-In extensions, the durability of Fusion extensions, or the convenience of Clip-Ins, the key is to consult with a skilled hair extension technician who can guide you through the process and help you achieve the hair of your dreams. With the right method, you can enjoy long, voluminous locks that enhance your natural beauty.

Read More »
Hair Treatment

The Importance of Preparing Your Hair for a Keratin Treatment

Silky, smooth, and frizz-free hair – that’s the promise of a keratin treatment. Whether you have curly, wavy, or straight hair, keratin treatments can work wonders in taming unruly locks and giving you a sleek, manageable mane. However, before you rush to the salon for this transformative treatment, it’s crucial to understand the importance of preparing your hair for a keratin treatment. In this article, we’ll delve into the essential steps you should take to ensure the best results and maximize the benefits of your keratin treatment. What is a Keratin Treatment? Before we dive into the preparation steps, let’s briefly explain what a keratin treatment is. A keratin treatment is a semi-permanent hair-smoothing and straightening method that helps eliminate frizz, reduce curl, and add shine. It works by infusing the hair with a special protein called keratin, which forms a protective layer around the hair shaft, making it smoother and more manageable. Why Preparing Your Hair Matters Preparing your hair for a keratin treatment is not just a formality – it’s a critical step that can significantly impact the results and longevity of the treatment. Here’s why it matters: 1. Better Absorption: 2. Improved Smoothness: 3. Prolonged Results: 4. Reduced Damage: Now that you understand the importance of preparing your hair, let’s explore the essential steps to get your hair ready for a keratin treatment: Step 1: Clarifying Shampoo Begin the preparation process by using a clarifying shampoo. This specialized shampoo removes excess oils, product buildup, and impurities from your hair, ensuring that the keratin treatment can penetrate your hair effectively. Make sure to rinse your hair thoroughly to ensure no residue remains. Step 2: Deep Conditioning After clarifying your hair, it’s essential to replenish moisture with a deep conditioning treatment. This step helps to nourish your hair and prepare it for the keratin treatment. Opt for a deep conditioner with natural oils and keratin to boost the treatment’s effectiveness. Step 3: Avoid Heat Styling In the days leading up to your keratin treatment, it’s crucial to avoid heat styling tools such as flat irons and curling wands. Excessive heat can damage your hair and interfere with the treatment’s results. Let your hair air dry naturally to minimize heat exposure. Step 4: Trim Your Ends If you have split ends or damaged hair, consider getting a trim before your keratin treatment. Trimming helps ensure that the treatment is applied evenly and effectively to the healthier parts of your hair. Step 5: Use Sulfate-Free Products Switch to sulfate-free hair care products in your regular routine. Sulfates can strip the hair of natural oils and affect the longevity of the treatment. Sulfate-free products are gentle on your hair and help maintain the treatment’s benefits. Step 6: Avoid Chlorine and Saltwater If you’re planning to get a keratin treatment before a beach vacation or poolside lounging, it’s essential to avoid chlorine and saltwater. These elements can compromise the treatment’s effectiveness. Consider wearing a swim cap or keeping your hair dry when swimming. Step 7: Consult with Your Stylist Consult with your stylist or the salon where you plan to get the keratin treatment. They can provide specific guidance on preparing your hair based on your hair type and the treatment brand they use. Step 8: Assess Your Expectations Lastly, it’s essential to have realistic expectations about the results of your keratin treatment. While the treatment can significantly improve the condition and manageability of your hair, it may not provide the same results for everyone. Discuss your expectations with your stylist to ensure they align with what the treatment can achieve. After the Treatment: Maintenance Once you’ve successfully prepared your hair and undergone the keratin treatment, proper maintenance is essential to prolong the results and keep your locks looking their best. Here are some maintenance tips: 1. Use Sulfate-Free Shampoo and Conditioner: 2. Avoid Excessive Washing: 3. Use Heat Protectant: 4. Touch-Up Treatments: 5. Regular Trims: 6. Avoid Excessive Sun Exposure: Conclusion Preparing your hair for a keratin treatment is a crucial step in achieving the best possible results. By following the steps outlined in this article and maintaining proper care afterward, you can enjoy the benefits of smoother, more manageable hair for an extended period. Consult with your stylist for personalized advice and enjoy the transformation that a well-executed keratin treatment can provide.

Read More »
Hair Treatment

Achieving Perfect Blonde Balayage: Tips and Tricks

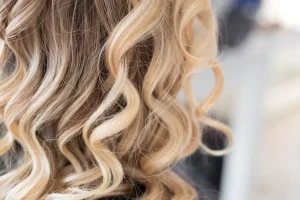
Blonde balayage has taken the world of hair color by storm, offering a stunning and low-maintenance way to brighten up your hair. Whether you’re looking for sun-kissed highlights or a bold transformation, balayage can deliver the perfect blonde hues you desire. In this article, we’ll explore the art of achieving the perfect blonde balayage and share valuable tips and tricks to ensure your hair looks effortlessly beautiful. What is Blonde Balayage? Before we delve into the tips, let’s clarify what blonde balayage is. Balayage is a French hair coloring technique that involves hand-painting highlights onto the hair for a natural, sunlit effect. Blonde balayage, specifically, focuses on creating soft, blonde tones that seamlessly blend with your base color. It’s a versatile option that can range from subtle and natural to bold and dramatic, depending on your preferences. Tip 1: Consultation is Key Before you embark on your blonde balayage journey, it’s essential to have a consultation with a professional colorist. During this consultation, discuss your hair goals, desired shade of blonde, and the level of maintenance you’re comfortable with. A skilled colorist will assess your hair’s current condition, texture, and natural color to determine the best approach for achieving your desired blonde balayage. Tip 2: Choose the Right Shade of Blonde Blonde comes in various shades, from cool, ashy tones to warm, golden hues. The choice of blonde shade should complement your skin tone and personal style. Cool blondes work well for those with fair or cool-toned skin, while warm blondes suit individuals with warmer or olive complexions. Your colorist can help you select the perfect shade for you. Tip 3: Maintain Hair Health Healthy hair is the canvas for a perfect blonde balayage. Ensure your hair is well-nourished and in good condition before undergoing the coloring process. Regular trims, deep conditioning treatments, and using sulfate-free products can help maintain your hair’s health. Tip 4: Trust the Process Balayage is a technique that requires precision and artistry. Trust your colorist to work their magic. Unlike traditional foil highlights, balayage offers a more natural and blended result, so it’s essential to let the colorist follow their instincts and create a customized look for you. Tip 5: Consider Face Framing For a radiant and flattering look, consider asking your colorist to focus on face-framing highlights. Lighter strands around your face can brighten your complexion and add dimension to your balayage. Tip 6: Don’t Rush the Process Balayage often involves multiple sessions to achieve the perfect blonde effect, especially if you’re starting with dark hair. Be patient and allow your colorist to gradually lighten your hair over several appointments. This ensures minimal damage and beautiful, natural-looking results. Tip 7: Maintain Your Blonde Balayage Once you’ve achieved the perfect blonde balayage, it’s crucial to maintain it properly. Here are some tips for ongoing care: Use Color-Protecting Products: Invest in high-quality color-protecting shampoos and conditioners specifically designed for blonde hair. These products help maintain the vibrancy of your blonde balayage and prevent brassiness. Limit Heat Styling: Excessive heat styling can cause your blonde hair to become dry and brittle. Try to reduce the use of hot tools, and always apply a heat protectant before styling. Regular Touch-Ups: Depending on the look you want to maintain, schedule regular touch-up appointments with your colorist. This helps to keep your roots in check and refresh your blonde balayage as needed. Deep Conditioning: Incorporate deep conditioning treatments into your hair care routine to keep your blonde locks moisturized and healthy. Consider using a purple or blue-toned mask to combat any brassiness. Sun Protection: The sun can fade your blonde balayage over time. When spending time outdoors, protect your hair by wearing a hat or using hair products with UV filters. Tip 8: Embrace Texture and Volume Blonde balayage looks particularly stunning when paired with texture and volume. Experiment with loose waves, beachy curls, or tousled styles to showcase the dimension and movement of your balayage. Tip 9: Be Realistic About Maintenance Blonde balayage is often celebrated for its low-maintenance nature compared to other blonde hair coloring techniques. However, it’s essential to be realistic about the level of upkeep required. While it doesn’t demand as much maintenance as full highlights, blonde balayage still benefits from regular touch-ups and color-protecting products to keep it looking its best. Tip 10: Confidence is Key Finally, remember that confidence is the ultimate accessory to complement your blonde balayage. Own your new look with pride, and you’ll radiate beauty and self-assuredness. Conclusion Achieving the perfect blonde balayage requires a combination of professional expertise and personal care. By following the tips and tricks outlined in this article and collaborating closely with your colorist, you can enjoy the beauty and versatility of blonde balayage. Whether you opt for a soft, subtle transition or a bold, sunlit transformation, your blonde balayage will enhance your natural beauty and leave you feeling radiant and confident.

Read More »
Hair Treatment

Hair Treatment for Thinning Hair: Solutions and Products

We’ve all had those days when we look in the mirror and notice that our once-thick and luscious hair is not as full as it used to be. Hair thinning is a common concern that can affect anyone, regardless of age or gender. The good news is that there are various hair treatments, products, and solutions available to help combat thinning hair and promote healthy hair growth. In this article, we’ll explore the causes of hair thinning and discuss effective treatments and products to address this issue. Understanding Hair Thinning Before we dive into the solutions, it’s essential to understand what causes hair thinning. Hair thinning can occur for various reasons, including: Now that we understand the common causes, let’s explore some effective hair treatment options and products to combat hair thinning. Hair Treatment Solutions Hair Products for Thinning Hair Now, let’s explore some hair care products that can help you manage and prevent further thinning: Dos and Don’ts for Thinning Hair Care In addition to the treatment options and products mentioned above, here are some dos and don’ts to keep in mind when caring for thinning hair: Dos: Don’ts: Conclusion Dealing with hair thinning can be a challenging experience, but there are numerous effective treatment options and products available to address the issue. Whether you choose topical treatments, medical therapies, or hair care products, it’s essential to consult with a healthcare professional or a lic

Read More »